
To simplify the installation of OpenVPN server, an installation script is available on github, named openvpn-install.
This script allows you to install and configure your own VPN server in less than 5 minutes by generating a .ovpn configuration file for use with the OpenVPN client on all GNU / Linux, MacOS X and Windows operating systems.
This default script allows:
- No logs
- Use only TLS 1.2 protocol
- AES-256-CBC encryption
- 4096 bits DH (instead of 2048 bits)
- DNS servers from FDN
- Setting up an iptables rule for routing the tun0 interface to eth0
OpenVPN automatic installation script for Debian, Ubuntu and CentOS
This script, we tested it only on Debian 8.
Download the script:
wget --no-check-certificate https://raw.githubusercontent.com/Angristan/OpenVPN-install/master/openvpn-install.sh
Make the script executable:
chmod + x openvpn-install.sh
Running the script:
./openvpn-install.sh
Then just answer the questions.
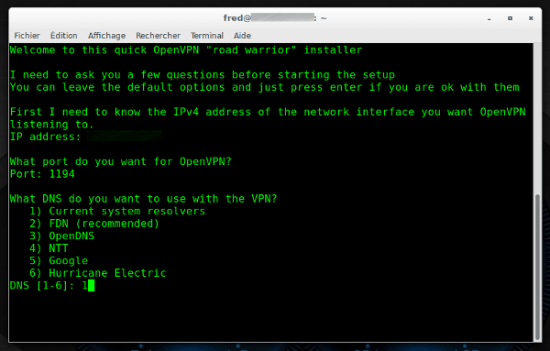
When finished, the script generates a .ovpn configuration file in the / root directory. This file is to be transferred to the client computer.
Make the script compatible with Linux Mint 18
Edit the openvpn-install.sh script:
sudo nano openvpn-install.sh
Add on line 33 before the directive ; then:
&& [["$ VERSION_ID"! = 'VERSION_ID = "18"']]

Configuration of the client
By default the file generated by the server is functional immediately, but we will make some small changes to force the use of DNS servers defined by the OpenVPN server and the addition of parameters for the management of logs.
Installation on the client computer of the packages needed to connect to the OpenVPN server
Normally the resolvconf package should already be installed, in doubt I added it..
- Arch Linux / Manajaro :
sudo pacman install openvpn resolvconf
- Debian / Ubuntu :
sudo apt-get- install openvpn resolvconf
- Fedora :
yum install openvpn resolvconf
Use DNS servers defined by the server
On the client machine install the package openvpn-update-resolv-conf :
- Arch Linux / Manjaro :
yaourt -S openvpn-update-resolv-conf
For other distributions :
wget --no-check https://github.com/masterkorp/openvpn-update-resolv-conf/blob/master/update-resolv-conf.sh
sudo mv update-resolv-conf.sh /etc/openvpn/
With openvpn-update-resolv-conf, it will be possible to force the use of the DNS servers defined on the OpenVPN server.
Modifying the client.ovpn configuration file to force the use of DNS servers
nano client.ovpn
Add these lines :
dhcp-option DNS
script-security 2
up /etc/openvpn/update-resolv-conf
down /etc/openvpn/update-resolv-conf
Log activation
Log Activation is not mandatory for OpenVPN to work, but in my case I activated logs to do monitoring with Munin.
To enable the logs, modify the configuration file on the OpenVPN server as follows :
nano /etc/openvpn/server.conf
Add:
#log
verb 3
mute 20
status /var/log/openvpn-status.log
log-append /var/log/openvpn.log
To support adding, restart the OpenVPN server :
systemctl restart openvpn
Connecting the client computer to the OpenVPN server
To connect to the OpenVPN server, enter the command :
sudo openvpn client.ovpn
Which gives :

We can check the IP address of the interface tun0 :
ip a | grep tun0
6: tun0:  mtu 1500 qdisc noqueue state UNKNOWN group default qlen 100
    inet 10.8.0.3/24 brd 10.8.0.255 scope global tun0
And check if the DNS server used :

Add a security layer with tls-auth
The directive tls-auth adds an additional HMAC signature for all TLS Handshake packets for integrity checking. Any UDP packet that does not bear the correct HMAC signature may be removed without further processing. This tls-auth directive provides an extra level of security, which helps protect yourself from:
- DoS attacks or port flooding on the OpenVPN UDP port.
- Port Scan to determine which UDP ports are listening.
- Vulnerabilities of buffer overflow in the implementation of TLS.
- Initiations of unauthorized machines during TLS handshake.
- To implement this directive, it is necessary to generate a secret key that will be shared between the server and the client.
Generation of the key on the OpenVPN server:
cd /etc/openvpn/
openvpn --genkey --secret ta.key
- In the server configuration file, add key-direction 0 and the path of the key :

- In the client file, add key-direction 1 and key:
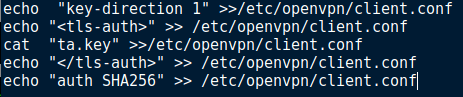
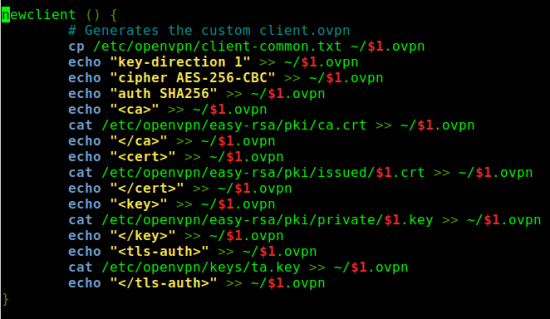
Or modify openvpn-install.sh:
nano openvpn-install.sh
Go to line 41 and change as follows:
- Relance du serveur OpenVPN :
systemd restart openvpn
External links:
https://github.com/Nyr/openvpn-install


