
ProFTPd is an open source and free FTP server compatible with all linux-like systems, Mac OS and windows (via cygwin). Read more about ProFTPd.
This tutorial demonstrates how to Configure ProFTPd To Use SFTP instead of FTP on Linux Ubuntu or Centos VPS.
Install ProFTPd
sudo apt-get update && sudo apt-get install proftpd
Choose “stand alone” when prompted during installation.
Open the ProFTPd configuration file with root privileges with your text editor:
sudo nano /etc/proftpd/proftpd.conf
Modify the IP address with your VPS IP or server name:
ServerName "22.22.22.22" (replace the IP with yours)
Remove the # from in front of the DefaultRoot parameter to uncomment it:
DefaultRoot ~
Save and close the file.
Configure SFTP Access with ProFTPd
Create a file to enable the use of SFTP:
sudo nano /etc/proftpd/conf.d/sftp.conf
Copy and paste the following into the file:
<IfModule mod_sftp.c>

        SFTPEngine on
        Port 2222
        SFTPLog /var/log/proftpd/sftp.log

        # Configure both the RSA and DSA host keys, using the same host key
        # files that OpenSSH uses.
        SFTPHostKey /etc/ssh/ssh_host_rsa_key
        SFTPHostKey /etc/ssh/ssh_host_dsa_key

        SFTPAuthMethods publickey

        SFTPAuthorizedUserKeys file:/etc/proftpd/authorized_keys/%u

        # Enable compression
        SFTPCompression delayed

</IfModule>
Deconstructing the SFTP Configuration
- SFTPEngine on: Enables the SFTP ability for the server
- Port 2222: Specifies the port where the SFTP connections will be accepted. Since SSH already is looking for connections on port 22, we want a different port.
- SFTPLog: Configures the location of the log file that will be created.
- SFTPHostKey: These two lines point to the SSH host keys. This is how the server identifies itself to clients. For the most part, the lines we used should be correct.
- SFTPAuthMethods: This line configures the server to only accept connections with SSH keys.
- SFTPAuthorizedUserKeys: This parameter names the location of the SFTP keys that can be used to authenticate someone. The
%uportion will substitute the authenticating user’s name. - SFTPCompression delayed: This sets the compression mechanism that will be utilized during file transfers.
Configure Key Based Authentication
The SSH keys to authenticate users used by ProFTPd must be converted to use the RFC4716 format. Luckily, the SSH suite has the ability to convert these files natively.
Create directory to house these files:
sudo mkdir /etc/proftpd/authorized_keysConvert the public keys:
sudo ssh-keygen -e -f ~username/.ssh/authorized_keys | sudo tee /etc/proftpd/authorized_keys/username
In case you have multiple users:
sudo ssh-keygen -e -f /path/to/id_rsa.pub | sudo tee /etc/proftpd/authorized_keys/username_who_owns_key
Disable SFTP Access on the SSH Port
Open the SSHD configuration file:
sudo nano /etc/ssh/sshd_config
Towards the bottom of the file, you should see a line that looks like this:
Subsystem sftp /usr/lib/openssh/sftp-server
Put a hash (#) in front of it to comment out the line:
# Subsystem sftp /usr/lib/openssh/sftp-server
Save and close the file. Then, restart the SSH server so to enable your changes:
sudo service ssh restartConnecting with a Client
Open FileZilla’s preferences. Find the “SFTP section in the left-hand menu.
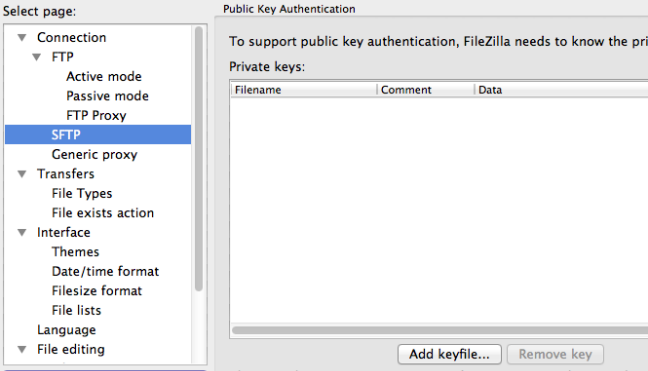
Click on “Add keyfile”, and navigate to the location of your private key. Usually, this will be in ~/.ssh/id_rsa.
Press “Okay” to exit the preferences.
In the main interface, type sftp:// followed by the domain name or IP address of your server in the “Host” field. Place your username in the “Username” field and fill in the port you chose for the “Port” field:

Click “Quickconnect” and FileZilla should connect automatically using your SSH keys.


